
Table of Contents
- What You'll Need Before Sharpening Your Garden Shears
- Signs of Dull Pruning Shears and When to Sharpen
- How to Clean Pruning Shears Before Sharpening
- Step-by-Step Guide to Sharpening Professional Garden Shears
- Best Sharpening Stone for Secateurs and Bypass Pruners
- How to Oil Garden Shears and Prevent Rust
- Common Mistakes to Avoid When Sharpening
- Troubleshooting Uneven Cutting After Sharpening
- Frequently Asked Questions
Last Updated: October 4, 2026
What You'll Need Before Sharpening Your Garden Shears
Sharpening professional garden shears requires the right tools and safety gear. Without them, you'll struggle to achieve a sharp edge and risk damaging your equipment.
Start by gathering your sharpening tools. A whetstone, diamond file, or ceramic sharpener will remove dull metal and restore the cutting edge.
You'll also need safety supplies. Wear protective gloves to avoid cuts from sharp blades. Keep a cloth nearby to wipe away metal shavings and debris as you work.
Essential sharpening tools
The right sharpener makes all the difference. Here are the main options:
- Diamond sharpeners: Ideal for general maintenance and quick touch-ups
- Ceramic sharpeners: Best for fine-edge honing and detailed work
- Carbide sharpeners: Designed for heavy-duty restoration of badly worn blades
- Whetstones: Traditional option that works well for most bypass pruners and anvil shears
At Toolpro, we stock professional-grade sharpeners suited to different needs. The Eze Lap Sharpener in medium grit works well for secateurs and loppers. The Bahco Sharpener with carbide inserts handles tougher restoration jobs. For fine honing, the Ceramic Sharpener delivers precision results.

You'll also need a clamping device to hold your shears steady. A bench vice or clamp keeps the tool secure while you sharpen.
Safety and cleaning supplies
Before you start, gather these items:
- Protective gloves (leather or cut-resistant)
- Clean cloth or rag for wiping blades
- Wire brush for removing corrosion
- Lubricating oil for after sharpening
- Safety glasses (optional but recommended)
Keep these supplies within arm's reach. You'll use them throughout the sharpening process.
Signs of Dull Pruning Shears and When to Sharpen
Dull shears damage plants instead of cutting cleanly. A sharp blade makes a clean cut through stems. A dull blade crushes tissue, leaving ragged edges that invite disease.
Here's how to tell if your shears need sharpening:
- The blade tears or crushes stems instead of slicing through cleanly
- You need to squeeze harder than usual to make a cut
- The blade skips or bounces when cutting soft stems
- Cuts appear ragged or brown at the edges
- You're working with professional garden shears daily and haven't sharpened them in months
Professional florists and nursery operators sharpen their tools regularly. If you use your shears several times per week, sharpen them every 4 to 8 weeks.
Don't wait until the blade is completely useless. Sharp blades cut cleaner and faster. This reduces hand fatigue during long pruning sessions.
How to Clean Pruning Shears Before Sharpening
A clean blade sharpens better than a dirty one. Sap buildup, rust, and debris prevent the sharpener from making proper contact with the metal.
Start with a basic wipe-down. Use a dry cloth to remove loose dirt and dried sap. For stubborn sap, soak the shears in warm water for 10 minutes, then scrub with a soft brush.
Removing sap and corrosion buildup
Sap hardens on the blade over time. This buildup prevents sharp edges from forming.
Here's how to remove it:
- Soak the shears in warm water for 10 minutes to soften sap
- Use a wire brush or soft scrub brush to remove the buildup
- For stubborn corrosion, apply a small amount of white vinegar and let sit for 5 minutes
- Scrub again with the brush
- Rinse with clean water and dry thoroughly with a cloth
Never use harsh chemicals or abrasive pads. These can damage the blade finish and remove protective coatings.
Disassembly for thorough cleaning
Many professional shears can be taken apart for deep cleaning. This lets you reach areas a brush can't.
Check your shear's manual to see if disassembly is recommended. Most bypass pruners have a pivot bolt that holds the two blades together. Loosen this bolt with an appropriate wrench.
Once apart, clean each blade individually:
- Scrub both sides with a wire brush
- Pay special attention to the cutting edge
- Remove all sap and rust
- Dry completely before reassembly
Reassemble carefully. The pivot bolt should be snug but not over-tightened. Test the spring tension by opening and closing the shears. They should close smoothly without sticking.
Step-by-Step Guide to Sharpening Professional Garden Shears
How to sharpen professional garden shears follows a consistent process. The key is maintaining the correct blade angle and applying steady pressure throughout.
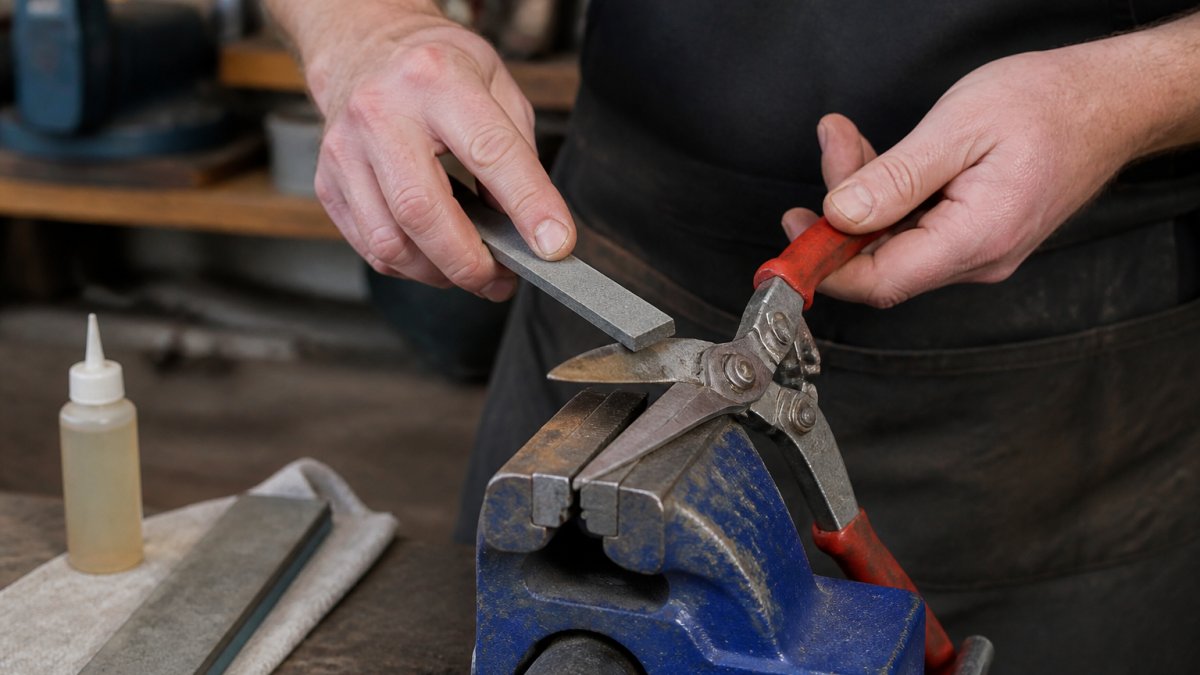
Step 1: Secure and clamp your shears
A loose shear moves during sharpening. This ruins your angle and wastes effort.
Clamp the shear blade firmly in a bench vice or clamp. Position it so the cutting edge faces up and is easily accessible. The blade should not move when you apply moderate pressure.
Tighten the clamp gradually. Too much pressure can damage the blade. You want it secure but not crushed.
Step 2: Establish the correct blade angle
The blade angle determines how well your shears cut. Most professional garden shears use a 15 to 20-degree bevel angle on the cutting edge.
Check your shear's manual for the exact angle. If you don't have it, 15 degrees is a safe starting point.
Hold your sharpening tool at this angle against the blade. The tool should rest flat against the bevel. Your hand position is crucial here. A slight angle change ruins the edge.
Step 3: Apply consistent sharpening strokes
Use smooth, controlled strokes along the entire cutting edge. Don't rush this step.
Here's the technique:
- Position the sharpener at the correct angle at the base of the blade
- Push the sharpener away from you along the blade edge
- Use medium pressure, not heavy pressure
- Lift the sharpener and return to the starting position
- Repeat 10 to 15 times on each blade side
- Check your progress frequently
Consistent pressure matters more than speed. Light, steady strokes build a sharp edge faster than aggressive grinding.
Step 4: Remove the burr and test the edge
A burr forms on the opposite side of the blade during sharpening. This tiny ridge of metal must be removed.
Use a few light strokes on the flat side of the blade to remove the burr. One or two strokes is usually enough.
Test the edge carefully. Run your thumb gently along the blade. A sharp edge feels slightly rough, not smooth.
For a more reliable test, try cutting soft paper or a thin stem. A properly sharpened blade cuts cleanly without crushing.
Best Sharpening Stone for Secateurs and Bypass Pruners
Different sharpeners suit different jobs. The best choice depends on your blade condition and how often you sharpen.
Diamond sharpeners for general maintenance
Diamond sharpeners work fast and suit regular maintenance. They're ideal if you sharpen every few weeks.
Diamond sharpeners have tiny diamond particles bonded to a steel or ceramic base. These particles cut through metal efficiently. They work on all blade types, from bypass pruners to anvil shears.
The Eze Lap Sharpener in medium grit is a popular choice for professional users. It's compact, durable, and effective for routine sharpening.
Ceramic sharpeners for fine-edge honing
Ceramic sharpeners produce a finer edge than diamond tools. They work best on blades that are already reasonably sharp.
Use ceramic sharpeners for touch-ups between major sharpenings. They refine the edge without removing much metal.
The Ceramic Sharpener from Toolpro offers fine-grade honing. It's 120mm long, sized perfectly for secateurs and snips. This tool excels at maintaining sharp edges on delicate tools used by florists and orchid enthusiasts.
Carbide sharpeners for heavy-duty restoration
Carbide sharpeners remove metal quickly. Use them when your blade is badly worn or hasn't been sharpened in months.
Carbide inserts are extremely hard. They cut through rust and dull metal efficiently. However, they remove more material than other sharpeners, so use them sparingly.
The Bahco Sharpener features carbide inserts designed for serious restoration work. It's a professional-grade tool suited to high-volume users like nurseries and landscaping contractors.

How to Oil Garden Shears and Prevent Rust
A sharp blade dulls quickly if it's not protected. Oil prevents rust and keeps the mechanism working smoothly.
Lubrication after sharpening
Apply oil immediately after sharpening. Don't let the freshly sharpened blade sit exposed to air.
Use a light machine oil or dedicated tool oil. Avoid heavy greases, these attract dirt and sap.
Here's the process:
- Wipe the blade clean with a dry cloth
- Apply a thin coat of oil to both blade surfaces
- Wipe away excess oil with a clean cloth
- Open and close the shears several times to distribute the oil
- Wipe the outside clean
The blade should look slightly glossy, not dripping wet. Too much oil attracts dust and debris.
Rust prevention and long-term maintenance
Rust forms when metal is exposed to moisture. Prevention is easier than removal.
Store your shears in a dry location. A workshop shelf or tool cabinet works well. Avoid leaving them outside or in damp sheds.
If you live in a humid climate, apply a thin oil coat monthly even if you're not sharpening. This maintains the protective layer.
For shears used in wet conditions, wipe and oil them immediately after use. Don't let sap or moisture sit on the blade.
Common Mistakes to Avoid When Sharpening
Most sharpening problems come from technique, not tools. Here are the mistakes that ruin blades:
Using the wrong angle. Every blade has an optimal bevel angle. Guessing ruins the edge. Check your shear's manual or start with 15 degrees.
Applying too much pressure. Hard pressing doesn't sharpen faster.
Sharpening one blade more than the other. Bypass pruners have two blades. Sharpen both equally.
Skipping the burr removal. The burr makes the edge feel sharp but it's actually fragile.
Not cleaning before sharpening. Sap and rust prevent proper contact between the sharpener and blade.
Over-sharpening. You don't need to sharpen for hours.
Ignoring rust. Small rust spots are easy to remove. Neglected rust eats through the blade.
Troubleshooting Uneven Cutting After Sharpening
Sometimes shears cut unevenly even after sharpening.
The shears cut to one side. This means one blade is sharper or longer than the other.
The shears don't close fully. Spring tension may be too tight. Loosen the pivot bolt slightly.
Cuts are still ragged after sharpening. You may not have achieved the correct blade angle.
One blade feels sharp but cuts poorly. Blade alignment matters as much as sharpness.
The shears feel loose or wobbly. The pivot bolt is too loose.
Keeping professional garden shears sharp is essential for clean cuts and healthy plants. Our Ceramic Sharpener, Bahco Sharpener, and Eze Lap Sharpener are designed for professional users who demand precision.

Frequently Asked Questions
How often should professional garden shears be sharpened?
Professional shears used daily should be sharpened every 4-8 weeks, depending on cutting volume and plant type. Hardwood or fibrous plants dull blades faster than soft herbaceous growth. If you notice the shears crushing rather than slicing cleanly, they need sharpening sooner. Maintenance honing between full sharpenings extends the interval and keeps the cutting edge in peak condition.
What is the best way to sharpen garden shears?
The best method involves securing your shears in a clamp, maintaining a consistent 15-20 degree bevel angle on the cutting edge, and using smooth, unidirectional strokes with your chosen sharpener. For bypass pruners and secateurs, sharpen only the bevelled side of the blade. A diamond sharpener like the Eze Lap works well for general maintenance, while ceramic sharpeners provide fine-edge honing. Test sharpness on paper or soft plant material before returning to work.
Can I use a whetstone to sharpen professional secateurs?
Yes, whetstones work well for secateurs, but they require more skill to maintain the correct angle than purpose-designed sharpeners. Oil stones and water stones are traditional options, but they demand consistent pressure and technique. For most professionals, a diamond sharpener or ceramic sharpener is faster and produces more consistent results. If using a whetstone, start with a coarse grit (1000-4000) for dull blades, then finish with fine grit (8000+) for edge refinement.
Should I disassemble my shears before sharpening?
Disassembly is not necessary for sharpening the blade itself, but it is essential for thorough cleaning beforehand. Removing the pivot bolt allows you to clean sap, corrosion, and metal shavings from inside the mechanism. Once cleaned and reassembled with proper spring tension, you can sharpen without disassembly. However, if your shears have uneven cutting or blade misalignment, disassembly lets you inspect and adjust the pivot bolt and blade geometry.