
Table of Contents
- How to Prune Orchids: A Step-by-Step Guide
- Where to Cut an Orchid Flower Spike: Green vs Brown vs Partially Dead
- When to Prune Orchids After Flowering
- How to Get Orchids to Rebloom: Realistic Expectations and Aftercare
- Tools for Pruning Orchids: What You Actually Need
- Pruning by Orchid Type: Phalaenopsis, Dendrobium, and Beyond
- Troubleshooting: Weak Spikes, Yellowing Leaves, and No Blooms
- Frequently Asked Questions
Last Updated: October 7, 2026
How to Prune Orchids: A Step-by-Step Guide
Knowing how to prune indoor orchids for better blooming is the fastest way to trigger a second bloom cycle. Get the cut point right and a healthy plant will often send up a new spike within weeks.
The process is simple: assess the spike, choose your cut point, then cut cleanly with sanitised snips. Here's how to prune indoor orchids for better blooming, step by step.
Step 1: Assess the Spike After Flowering
Wait until every flower has dropped before you touch the spike. A flower spike is the long stem that carries the blooms, and it stays useful after the flowers fall.
Check the spike from tip to base:
- Green and firm: still alive, keep it
- Brown and hollow: dead, remove it
- Green at the base, brown at the tip: partially dead, trim the dead section
Don't cut while any flowers remain. The plant is still feeding the blooms.
Step 2: Choose Your Cut Point
Count up from the base of the spike to the first node. A node is a small bump or notch where a new spike can form.
For a rebloom, cut about 1cm above the second node. Cutting higher leaves more nodes but weaker spikes. Cutting lower pushes the plant to start fresh.
If the whole spike is brown, cut at the base instead, leaving about 2cm above the leaves.
Step 3: Cut and Sanitise
Use sharp snips and make one clean cut. Crushed tissue invites rot.
Wipe your blades with rubbing alcohol between plants. This stops disease passing from one orchid to the next.
After cutting, move the plant back to bright, indirect light and resume normal watering.
Where to Cut an Orchid Flower Spike: Green vs Brown vs Partially Dead
The cut point depends entirely on the colour and condition of the spike. Green spikes get cut above a node. Brown spikes get cut at the base. Partially dead spikes get the dead section removed only.
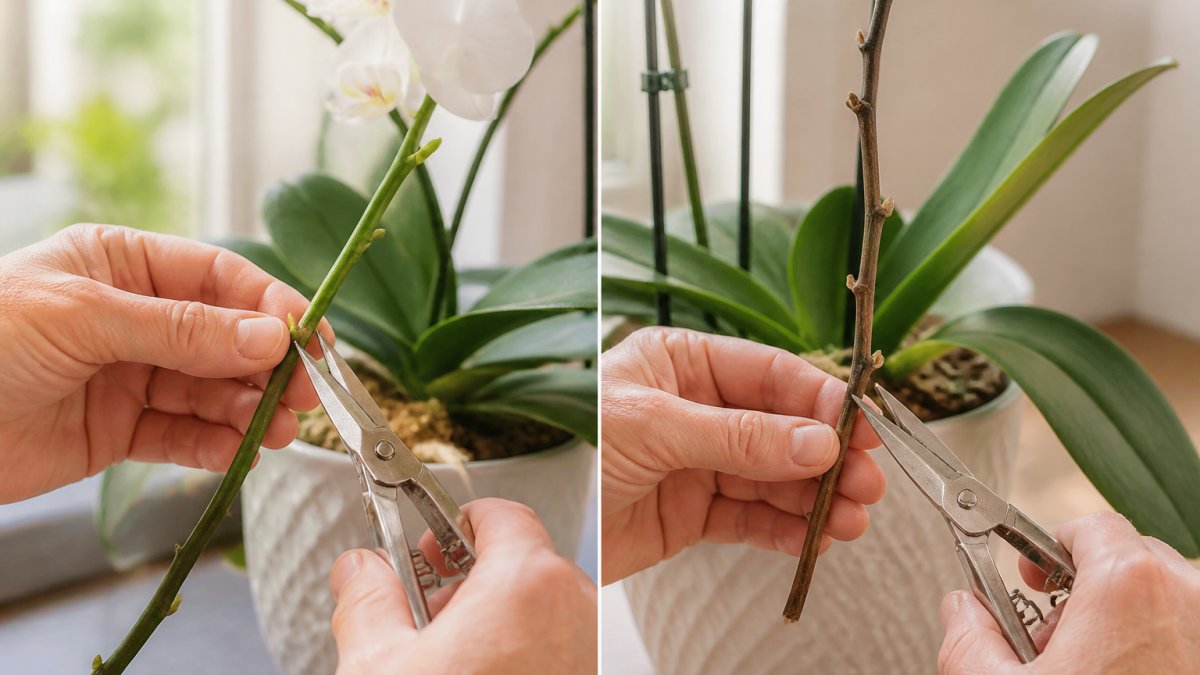
Here's the decision tree:
| Spike Condition | Where to Cut | What Happens Next |
|---|---|---|
| Green and firm | 1cm above second node | Rebloom from the same spike |
| Brown and dried | At the base, 2cm above leaves | Plant rests, then grows a new spike |
| Green base, brown tip | Remove brown tip only | Base may still produce buds |
| Yellowing | Wait one more week | Colour often settles before you cut |
If you're unsure, wait. A spike that looks dead one week can green up the next.
When to Prune Orchids After Flowering
Prune orchids after flowering once the last bloom drops and the spike stops growing. Most indoor orchids rest for a few weeks first, so there's no rush, but "no rush" is not the same as "any time". Timing decides whether you get a second flush from the existing spike or force the plant into a full rest.
The mechanism is simple. While a spike is green, the plant is still holding it as a viable flowering structure. Cut it while it is green and you remove the nodes that could have produced a side branch.
Use this rule instead of guessing:
- Spike still green and firm, last flower dropped less than two weeks ago: wait. Give it another 7-10 days. Many Phalaenopsis will start a side branch from a node on their own, and you would be cutting that off.
- Spike green but no new growth after three weeks: cut 1cm above the second node. The plant has decided not to rebloom from the tip, so redirect it.
- Spike brown and dry from the tip down: cut at the base, 2cm above the leaves. Do not wait for the whole spike to brown, the dead section is already useless.
- Spike yellowing but still pliable: wait one more week. Yellow often settles back to green, or progresses to brown. Cutting during the transition is the one time you can genuinely waste a spike.
For orchids that flower once a year, Cattleya, many Dendrobium, and most Oncidium, pruning after flowering lines up with their natural rest period. That rest is what sets up the next bloom cycle, so the timing question is less about the spike and more about not interrupting the rest.
A common pattern among growers is to mark the calendar the day the last flower drops. That single date tells you when to reassess: one week for a green spike, three weeks for a stalled one, and immediately for a brown one. It removes the guesswork that makes most timing advice useless.
How to Get Orchids to Rebloom: Realistic Expectations and Aftercare
Getting orchids to rebloom takes patience, not luck. Most indoor orchids bloom once or twice a year, and the two rebloom pathways have very different timelines. Knowing which one you are on stops you from over-correcting when nothing appears.
Pathway 1, rebloom from the existing spike. If you cut above a node on a green spike, a side branch can emerge from that node in roughly four to eight weeks.
Pathway 2, a brand new spike from the base. If you cut the spike at the base, or the plant is a type that does not rebloom from old spikes, expect a new spike in two to three months, and sometimes longer.
Chikamasa Ultra Light Stainless Steel Snips →
After pruning, focus on the conditions that actually drive the mechanism:
- Light: bright but indirect, near an east-facing window. A Phalaenopsis needs roughly 10,000-15,000 lux to initiate spikes. Below that, it grows leaves but not flowers.
- Water: let the potting mix dry slightly between waterings. Constant moisture keeps the plant in vegetative growth and suppresses spike initiation.
- Temperature: a drop of 5-10°C at night is the trigger most growers miss. The plant interprets cooler nights as a seasonal cue to flower. Two to three weeks of cooler nights is usually enough to start a spike.
- Humidity: 50-70% keeps developing buds from drying out and dropping before they open.
- Feeding: a balanced orchid fertiliser every two weeks during the growing season. Switch to a higher-phosphorus feed when you see the first spike tip.
The night temperature drop is the single most reliable lever. Orchids set spikes when nights run cooler than days by around 8°C. Move the plant to a cooler room for two to three weeks and watch for a small green tip emerging from the base or from a node.
Root health underpins everything. A plant with damaged or mushy roots cannot take up the water and nutrients a spike requires, no matter how perfect the light and temperature.
Tools for Pruning Orchids: What You Actually Need
You need one sharp pair of snips and something to sanitise them. That's it. Orchid stems are soft, so heavy tools do more harm than good.
For delicate work, fine stainless steel snips give you control around nodes. Chikamasa Ultra Light Stainless Steel Snips are 185mm and weigh just 55g, which suits long sessions without hand fatigue. The ARS 320DX-T Fine Stainless Steel Scissors at 155mm are built for precision work like propagation and trimming close to a node.

For general orchid care and light pruning, the ARS 300L Snips handle both. They're 190mm, made from carbon steel, and priced at $21.00.
Sanitising Between Plants
Wipe blades with rubbing alcohol before moving to the next plant. This is the single most overlooked step in orchid care.
A dirty blade spreads fungal and bacterial problems between plants in seconds. One infected orchid can pass rot to an entire collection through a shared cut.
Keep a small spray bottle of alcohol on your bench. Spray, wipe, cut. It adds seconds to the job and saves plants.
Pruning by Orchid Type: Phalaenopsis, Dendrobium, and Beyond
Different orchids need different pruning. Phalaenopsis rebloom from the same spike, while Dendrobium and most other types don't.
Here's how the main indoor types differ:
- Phalaenopsis: cut above the second node for a second bloom from the same spike
- Dendrobium: cut the whole spike at the base once flowers drop
- Oncidium: cut at the base, as spikes rarely rebloom
- Cattleya: cut at the base and let the plant rest
Get the type wrong and you either waste a rebloom or leave dead wood on the plant. Check the label when you buy, or ask the grower.
For growers working across several types, the ARS Snips in stainless steel handle everything from light pruning to harvesting. They're 183mm and built for nurseries and floristry work.

Troubleshooting: Weak Spikes, Yellowing Leaves, and No Blooms
Weak spikes, yellow leaves, and no blooms usually trace back to light, water, or root health. Fix the cause and the plant recovers.
Common problems and fixes:
- Yellowing leaves: usually too much direct sun or overwatering; move to indirect light and let the mix dry
- No blooms for a year: not enough light or no night temperature drop
- Weak, thin spikes: needs feeding during the growing season
- Brown tips on leaves: low humidity or mineral buildup in the water
Pruning leaves follows the same logic as spikes. Remove only dead or damaged tissue, cut at the base of the leaf, and sanitise between cuts.
Damaged roots are different. Repot rather than prune, and only trim roots that are mushy or black.
Frequently Asked Questions
What happens if you don't prune an orchid?
An unpruned orchid will eventually stop producing new flowers from that spike. The plant redirects energy into maintaining the old spike rather than growing new roots or leaves. In most cases, the spike will dry out and turn brown on its own, but this can take months. Leaving dead tissue attached increases the risk of fungal issues and pest attraction. Pruning orchids after flowering signals the plant to rest and prepare for the next bloom cycle.
Where do you cut an orchid after the flowers fall off?
For a green spike, cut about 1cm above the second node from the base using clean snips. A node is the small raised bump along the stem. If the spike is brown or yellowing, cut it at the base, roughly 2-3cm above where it emerges from the leaves. Always use sharp, sanitised tools. The Chikamasa Ultra Light Stainless Steel Snips at 185mm are well suited to this precision work.
Can pruning an orchid make it bloom again?
Yes, but only if the spike is still green and has unused nodes. Cutting above a node on a healthy green spike can encourage a secondary bloom, though flowers are usually smaller and fewer than the first flush. A brown or dried spike will not rebloom regardless of where you cut. For reliable reblooming, the plant needs a temperature drop of about 5-8°C at night for several weeks, plus bright indirect light.
How long do orchids rebloom on old stems?
A Phalaenopsis can produce a secondary spike from an old green stem within 8 to 12 weeks of pruning, provided the plant is healthy and has enough stored energy. After one secondary bloom, the spike typically declines. Most growers cut the spike at the base after that second flowering to let the plant recover fully before the next main bloom cycle, which usually takes 6 to 12 months.
Pruning an indoor orchid the right way comes down to clean cuts, sharp tools, and patience. Toolpro stocks professional-grade snips, scissors, and sharpeners built for precise work on delicate plants, along with spare parts to keep your tools cutting cleanly for years. Get started with Toolpro and give every orchid the clean cut it needs to bloom again.